| PDF资料下载 |
暂无数据
|
|---|
参数有误?
| 参数 | 参数值 | 操作 |
|---|---|---|
| 商品目录 | 扩充板模块 | |
| 主芯片编码 | SAM D21G |
The Robotics Masters Robo HAT MM1 is an open source robotics controller board for Raspberry Pi. It is education focused but works in many applications. The Robo HAT provides all the hardware you need in one simple, easy-to-use form factor. It removes the initial barriers to starting any robotics project.
With support for Adafruit CircuitPython, Arduino IDE, and other libraries the Robo HAT is able to act as a single solution for all projects great and small.
The Robo HAT MM1 removes the need for buying lots of individual components by including them on the board. It can act as a PWM driver, provide on-board power through voltage regulators, and measure movement with the on-board IMU - all at the same time.
The wide compatibility with many open source software platforms such as CircuitPython, SeeSaw, and Arduino IDE means you can use all existing software for sensors while creating your project in the way that works best for you. The hardware schematics and software are fully open source.
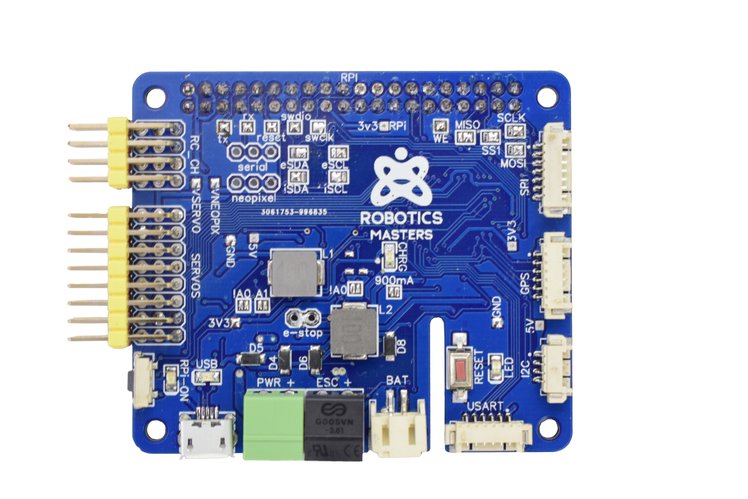
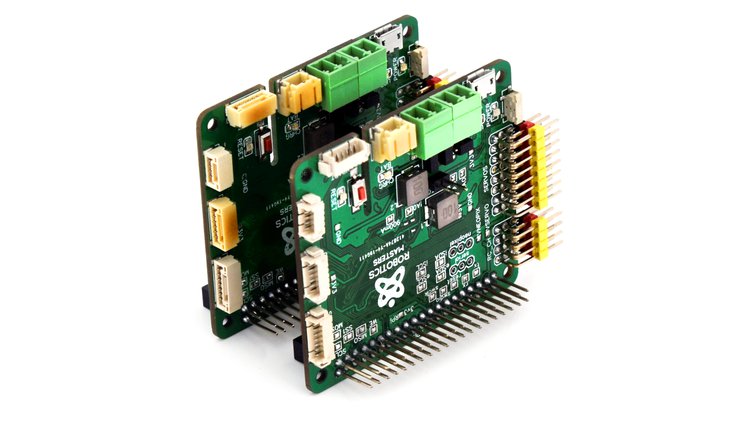
The final revision boards will be blue, like this!
● Multiple power sources for stable and reliable power
● E-Stop connection for emergency shutdown
● Power-on switch for the 5V main power on the board
● Power monitoring, movement sensing (IMU) and control.
● 16-Bit PWM output (configurable up to 24-Bit)
● Selectable SPI Master between Raspberry Pi and M0
● Standard connectors for drone sensors
● Selectable I²C internal and external buses for extra sensors
● Stable on-board power supply for Raspberry Pi boards (5.1V @ 2.5A)
● USB connection for uploading new firmware
● USB to serial port access
● USB Storage access for CircuitPython
● USB doubles as charging for backup LiPO Battery (at same time)
Features & Specifications
● Processor: 48 MHz SAM D21G (M0)
● Memory: 32 KB SRAM
● Storage: 256 KB internal programmable flash + additional 8 MB SPI flash
● Multi-product Compatibility
• Jetson Nano
• Raspberry Pi: all models with 40 pin header
- Model B+, 2B, 2B+, 3B and 3B+
- Model A+ and 3A+
- Zero and Zero W
● Raspberry Pi Interfacing
• Two (2) GPIO directly to Raspberry Pi (SW programming)
• Two (2) GPIO directly to Raspberry Pi (UART-serial console)
• I²C or SPI to Raspberry Pi
• EEPROM recognition
● Programmable I/O: All are re-programmable to match a supported special function
• Eight (8) x 16-bit servo output (programmable up to 24-bit)
• Four (4) x 16-bit RC controller input
• Two (2) x Serial console pass through
• One (1) x NeoPixel output
• Nine (9) x GPIO pins through SPI / GPS ports
● Sensor Interfacing: Also re-programmable as general IO pins
• Dronecode Compatible Connectors
- SPI
- GPS
- USART
- I²C
● Triple-redundant Power Supply Support
• Feedback through servo power rail (e.g., from ESC)
• 5 V from on-board regulator powered through main battery
• 5 V from on-board regulator power through backup LiPo battery + charger via USB
● Built-in Protection
• USB Port is protected from voltage spikes
• All power rails are protected by reverse voltage protection circuits.
• 5 V regulator is able to power Raspberry Pi
● Sensors
• INA219 current sensor
• MPU9250 9DoF high-precision IMU
• Add-on boards through I²C and SPI (such as pressure sensor, secondary IMU, etc)
● Physical Dimensions
• Standard HAT format
• Length: 65 mm
• Depth: 56.5 mm
• Height: 30 mm
Applications
As makers ourselves, we wanted to create a platform that was able to help us build more cool projects. We wanted an affordable board that had a good fix of useful features. This included lots of servo outputs, lots of inputs, great mix of sensors like the IMU, current sensing and functionality to build new and creative projects. With the Robo HAT MM1 we have been able to do just that.
It’s a more functionally Arduino with support for all the great existing libraries. It’s a better CircuitPlayground and Adafruit Feather, without the need for additional boards.
Robo HAT MM1 is the perfect combination of hardware power and software flexibility - making it an essential tool for any robotics project.
The Donkey Car and DIY Robocar community groups have been crucial to the Robo HAT MM1 development. We have tested the HAT with the Donkey Car Platform (a widely used small-scale autonomous car kit) and it works very well.
The Robo HAT MM1 removes the need for a PWM driver, external power, or voltage regulators, and adds additional functionality. The Robo HAT MM1 includes an IMU (Inertial Measurement Unit) - which can be used to measure the movement of the car. It also includes RC controller inputs, which remove any latency or delays caused by using the Raspberry Pi to control the car during training. With Robo HAT MM1, you can simplify your setup while improving the overall autonomous vehicle project.
We are already using the Robo HAT MM1 (and autonomous cars) as educational tools in school programs and workshops.
One of the core drivers of this project was the changing curriculum in Australian schools - all students must now learn to code as part of their technology course (this change came through in January 2019). Project Based Learning (PBL) - learning through doing or creating something seems to be the best way to teach students programming. We wanted to create a platform that could be used to learn the very basics of programming, all the way up to robotics and autonomous cars and beyond! The Robo HAT MM1 is one of the ways we hope to achieve better programming education in schools.
CircuitPython is one of the key parts to enable this, as students can start learning the basics of Python and then advance up to more complicated tasks.
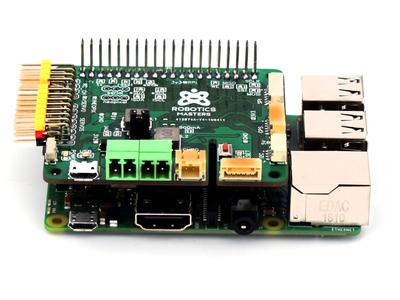
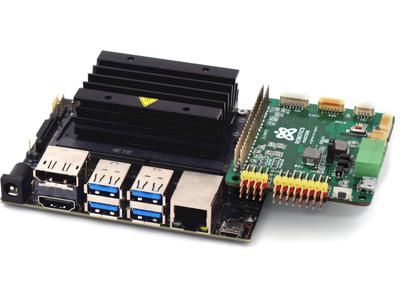
Robo HAT MM1 works with RaspberryPi, Jetson Nano, and standalone. Board revision 6 seen here.
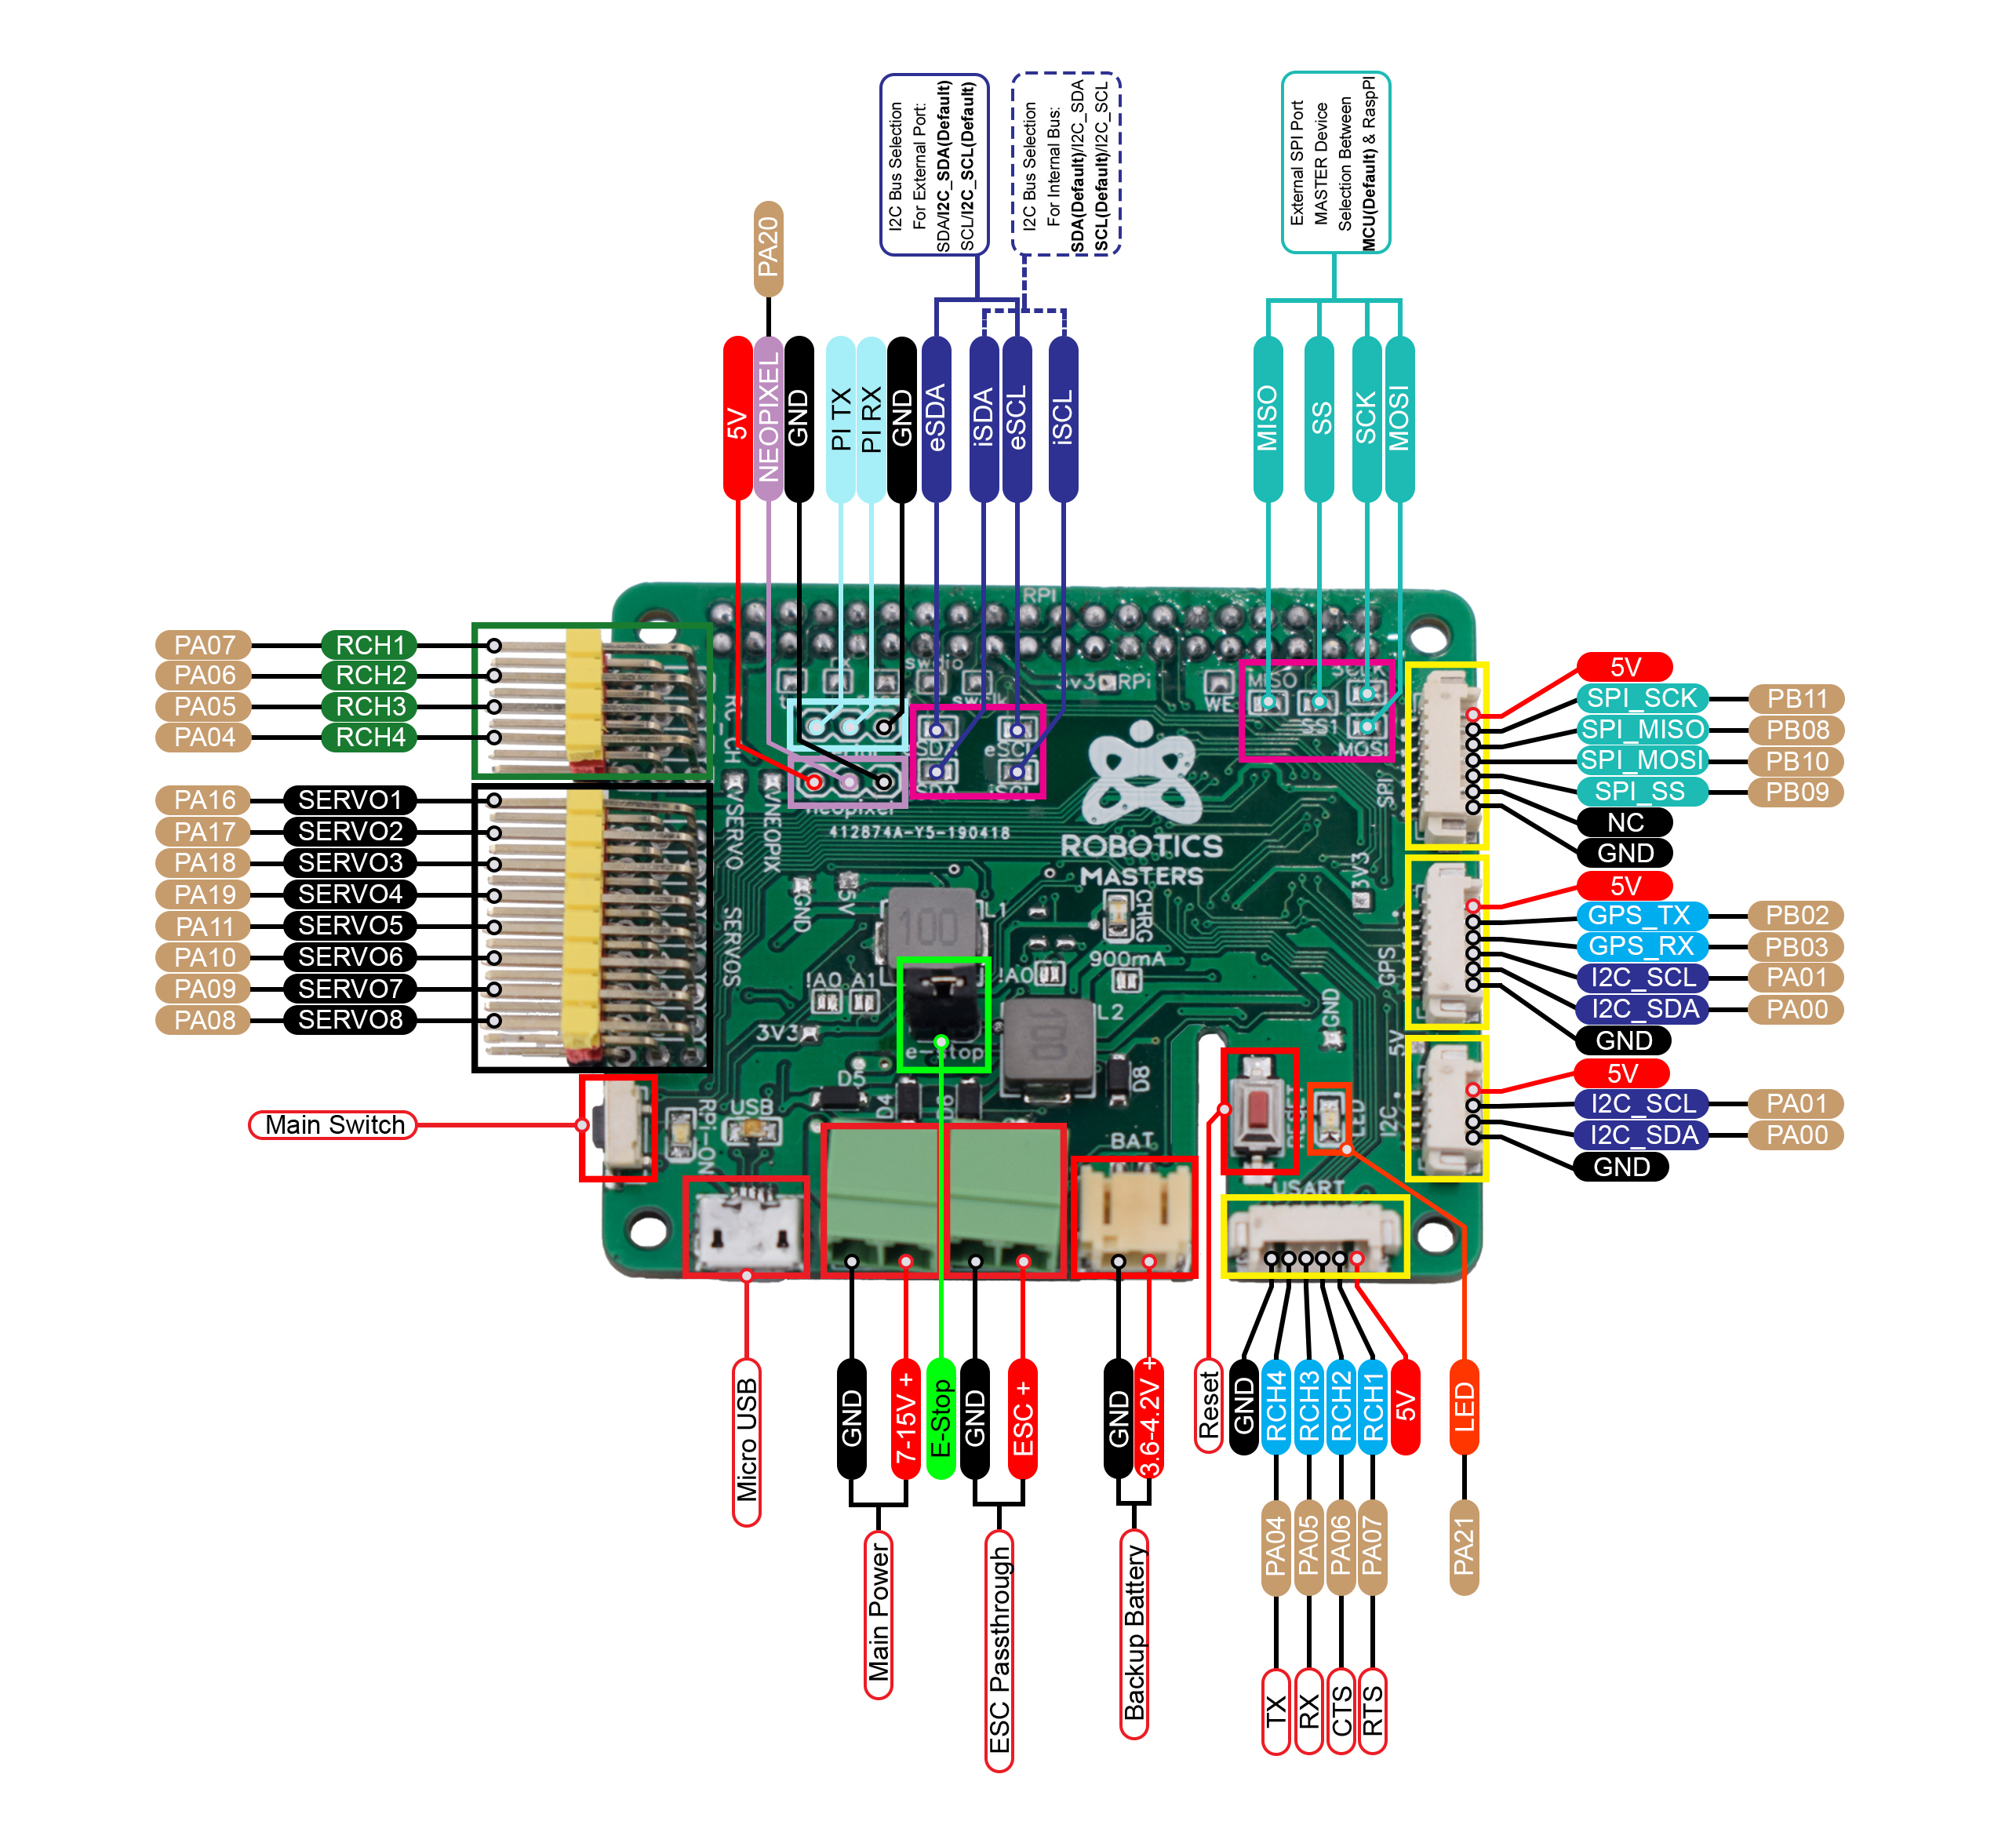
Board Diagrams

| External | |
|---|---|
| A. Inputs for radio controller | H. Auxiliary battery (4.2 V) |
| B. Raspberry Pi header (final version not stackable) | I. ESC power pass through |
| C. SPI connector | J. Main battery (7-15 V, 1000 mAh capacity) |
| D. GPS connector | K. USB connector |
| E. I²C external connector | L. Power-on button |
| F. Telemetry / USART connector | M. Outputs for servos |
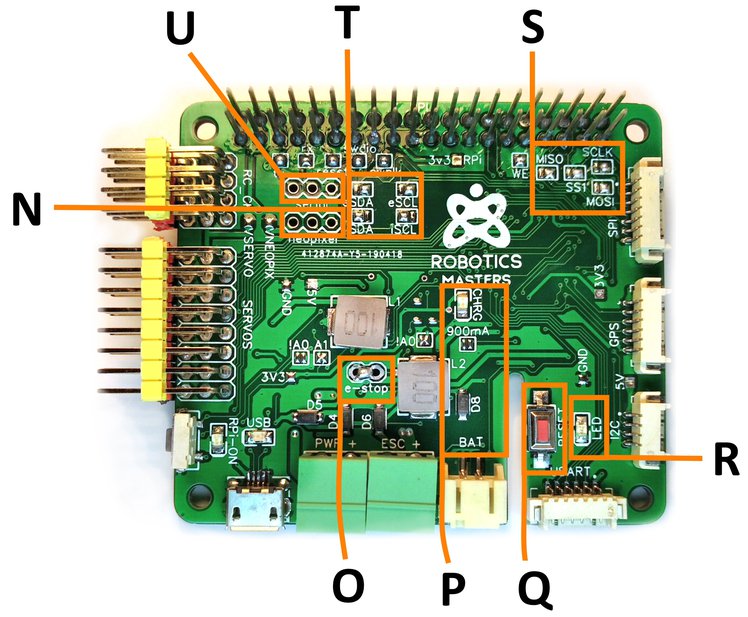
| Internal | |
|---|---|
| N. NeoPixel header | R. LED |
| O. E-Stop header | S. Pads for switching SPI connector |
| P. LiPo battery charging | T. Pads for switching I²C bus |
| Q. Reset button | U. Serial header |
Tons of Software Options
With support for major existing platforms, you are guarenteed to get your project up and running as fast as possible.
We designed Robo HAT MM1 to work with a wide range of software libraries, to enable anyone to build the project they want. This flexibility also means that Robo HAT MM1 is well-suited to a wide variety of use-cases.
CircuitPython is an education friendly open source derivative of MicroPython. CircuitPython supports use on educational development boards designed and sold by Adafruit. Adafruit CircuitPython features unified Python core APIs and a growing list of Adafruit libraries and drivers of that work with it.
CircuitPython adds hardware support to all of these amazing features [of Python]. If you already have Python knowledge, you can easily apply that to using CircuitPython. Even if you have no previous experience, it’s really simple to get started.
CircuitPython is a special programming language developed by Adafruit that is based on Python but focused purely on writing code for hardware. It has many thousands of libraries for different sensors. It makes programming motors, servos, sensors and other bits easy. CircuitPython doesn’t require any software on your computer - it runs on the board (Robo HAT MM1) which appears as a USB drive.
Typically, CircuitPython is what we expect our backers to be using. We have used it for reading data from the MPU9250 IMU sensor, then using that data to control a robot arm. We have also used it to read RC signals from an RC Remote and send those signals back to the Servos attached to the Robo HAT. There are many other example uses that you can come up with. Adafruit has many great tutorials on CircuitPython and how to use it.
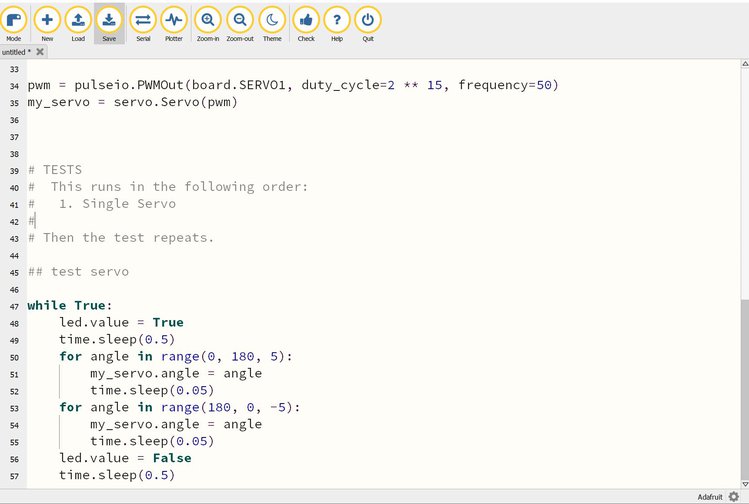
CircuitPython screenshot.
Seesaw is an open source microcontroller friend for other chips. It provides a variety of capabilities such as UART, ADC, DAC, extra GPIO, etc. to chips that don’t have them.
The other Adafruit library we are supporting is SeeSaw. SeeSaw runs on the Robo HAT and you can use a Raspberry Pi to make it do things using Python. All commands are sent from the Raspberry Pi to the Robo HAT over I2C. The typical use case for this would be that you have a robot or car that you only want to use the Robo HAT to control Servo Motors, Encoders or other attached sensors over UART or SPI.
SeeSaw can be partnered with a Raspberry Pi to form a powerful combination. The Raspberry Pi can do all the hard calculations for your robot (such as neural networks and image processing) and then send all the control commands to the Robo HAT MM1 through I²C running SeeSaw. SeeSaw has many special functions built into it, including: 16-bit servo control (much higher than normal 8-bit or common 12-bit), 12-bit analog read, USB-Serial to UART for communicating with the Raspberry Pi via USB, and more.
We are expanding SeeSaw SeeSaw has a few limitations. It only supports some features of the powerful processor on the Robo HAT MM1. We are looking at expanding what SeeSaw is able to do to support RC Input and controlling some logic of the board (like the power-on button). It is also well documented. Overall, it is a very useful library if you plan on using the Raspberry Pi and the Robo HAT together.
The classic Arduino IDE used by many thousands of makers around the world can also be used to program and deploy code to the Robo HAT MM1.
Most people are familiar with the Arduino IDE. It has many millions of users around the world. It brings with it all the existing libraries and code examples that work on popular Arduino boards. We are supporting this as it allows the existing THOUSANDS of software libraries developed for Arduino to run on the Robo HAT. This includes interfacing with GSM modules, reading GPS coordinates, and using any kits that you may already have.
Almost any hardware problem when using Arduino has already been solved by an online forum! This is the sort of support we wanted to maintain with the Robo HAT, and can by having Arduino’s programming environment available to backers.
We believe that these libraries can be added on in the future, expanding the number of projects that you can do.
We are currently working on these libraries and plan on bringing others as fast as possible.
- ArduPilot Control (testing)
- PX4 (Dronecode) Flight Control (in development)
- Scratch Environment (in development)
The Robo HAT MM1 holds its own amongst the drone controllers, CircuitPython boards and other Raspberry Pi HATs.
| MM1 HAT | PXFmini (unavailable) | NAVIO2 | PixHawk Cube | Feather M0 | CrickitHAT | Sense HAT | |
|---|---|---|---|---|---|---|---|
| Open Hardware | Open | Closed | Closed | Closed | Open | Open | Closed |
| Onboard Microprocessor | Yes | No | Yes | Yes | Yes | Yes | No |
| Flash Storage | 8 MB | 2 MB | 2 MB | 2 MB | |||
| Sensors | |||||||
| Accelerometer | Yes | Yes | Yes | Yes | No | No | Yes |
| Gyroscope | Yes | Yes | Yes | Yes | No | No | Yes |
| Magnetometer | Yes | Yes | Yes | Yes | No | No | Yes |
| Pressure | External | Yes | Yes | Yes | No | No | Yes |
| Temperature | Yes | No | No | No | No | No | Yes |
| Current | Yes | No | Yes | No | No | No | No |
| GPS | External | No | Yes | No | No | No | No |
| I/O | |||||||
| PWM Outputs | 8 | 8 | 14 | 8 | 7 | 4 | 0 |
| Input Channels | 4 | 1 | 1 | 2 | 7 | 8 | 0 |
| Additional GPIO | 11 | 0 | 0 | 6 | 7 | 8 | 0 |
| Total GPIO | 23 | 9 | 15 | 16 | 21 | 20 | 0 |
| Connectors | |||||||
| GPS | Yes | No | No | Yes | No | No | No |
| I²C | Yes | Yes | Yes | Yes | No | No | No |
| UART | Yes | Yes | Yes | Yes | No | No | No |
| SPI | Yes | No | No | No | No | No | No |
| CAN | No | No | No | Yes | No | No | No |
| USB | Yes | No | No | Yes | Yes | Yes | No |
| Power | |||||||
| Triple - Redundancy | Yes | Yes | Yes | Yes | No | No | No |
| Raspberry Pi | Yes | Yes | Yes | No | No | No | No |
| Software | |||||||
| Arduino IDE | Yes | No | No | No | Yes | Yes | No |
| Python | Yes | Yes | No | No | No | Yes | Yes |
| CircuitPython | Yes | No | No | No | Yes | No | No |
| SeeSaw | Yes | No | No | No | Yes | Yes | No |
| ArduPilot | Yes | Yes | Yes | Yes | No | No | No |
| Price | $39 | $80 | $170 | $240 | $20 | $35 | $40 |
| ECCN | ERA99 |
| HSCODE |
The Robotics Masters Robo HAT MM1 is an open source robotics controller board for Raspberry Pi. It is education focused but works in many applications. The Robo HAT provides all the hardware you need in one simple, easy-to-use form factor. It removes the initial barriers to starting any robotics project.
With support for Adafruit CircuitPython, Arduino IDE, and other libraries the Robo HAT is able to act as a single solution for all projects great and small.
The Robo HAT MM1 removes the need for buying lots of individual components by including them on the board. It can act as a PWM driver, provide on-board power through voltage regulators, and measure movement with the on-board IMU - all at the same time.
The wide compatibility with many open source software platforms such as CircuitPython, SeeSaw, and Arduino IDE means you can use all existing software for sensors while creating your project in the way that works best for you. The hardware schematics and software are fully open source.
The final revision boards will be blue, like this!
● Multiple power sources for stable and reliable power
● E-Stop connection for emergency shutdown
● Power-on switch for the 5V main power on the board
● Power monitoring, movement sensing (IMU) and control.
● 16-Bit PWM output (configurable up to 24-Bit)
● Selectable SPI Master between Raspberry Pi and M0
● Standard connectors for drone sensors
● Selectable I²C internal and external buses for extra sensors
● Stable on-board power supply for Raspberry Pi boards (5.1V @ 2.5A)
● USB connection for uploading new firmware
● USB to serial port access
● USB Storage access for CircuitPython
● USB doubles as charging for backup LiPO Battery (at same time)
Features & Specifications
● Processor: 48 MHz SAM D21G (M0)
● Memory: 32 KB SRAM
● Storage: 256 KB internal programmable flash + additional 8 MB SPI flash
● Multi-product Compatibility
• Jetson Nano
• Raspberry Pi: all models with 40 pin header
- Model B+, 2B, 2B+, 3B and 3B+
- Model A+ and 3A+
- Zero and Zero W
● Raspberry Pi Interfacing
• Two (2) GPIO directly to Raspberry Pi (SW programming)
• Two (2) GPIO directly to Raspberry Pi (UART-serial console)
• I²C or SPI to Raspberry Pi
• EEPROM recognition
● Programmable I/O: All are re-programmable to match a supported special function
• Eight (8) x 16-bit servo output (programmable up to 24-bit)
• Four (4) x 16-bit RC controller input
• Two (2) x Serial console pass through
• One (1) x NeoPixel output
• Nine (9) x GPIO pins through SPI / GPS ports
● Sensor Interfacing: Also re-programmable as general IO pins
• Dronecode Compatible Connectors
- SPI
- GPS
- USART
- I²C
● Triple-redundant Power Supply Support
• Feedback through servo power rail (e.g., from ESC)
• 5 V from on-board regulator powered through main battery
• 5 V from on-board regulator power through backup LiPo battery + charger via USB
● Built-in Protection
• USB Port is protected from voltage spikes
• All power rails are protected by reverse voltage protection circuits.
• 5 V regulator is able to power Raspberry Pi
● Sensors
• INA219 current sensor
• MPU9250 9DoF high-precision IMU
• Add-on boards through I²C and SPI (such as pressure sensor, secondary IMU, etc)
● Physical Dimensions
• Standard HAT format
• Length: 65 mm
• Depth: 56.5 mm
• Height: 30 mm
Applications
As makers ourselves, we wanted to create a platform that was able to help us build more cool projects. We wanted an affordable board that had a good fix of useful features. This included lots of servo outputs, lots of inputs, great mix of sensors like the IMU, current sensing and functionality to build new and creative projects. With the Robo HAT MM1 we have been able to do just that.
It’s a more functionally Arduino with support for all the great existing libraries. It’s a better CircuitPlayground and Adafruit Feather, without the need for additional boards.
Robo HAT MM1 is the perfect combination of hardware power and software flexibility - making it an essential tool for any robotics project.
The Donkey Car and DIY Robocar community groups have been crucial to the Robo HAT MM1 development. We have tested the HAT with the Donkey Car Platform (a widely used small-scale autonomous car kit) and it works very well.
The Robo HAT MM1 removes the need for a PWM driver, external power, or voltage regulators, and adds additional functionality. The Robo HAT MM1 includes an IMU (Inertial Measurement Unit) - which can be used to measure the movement of the car. It also includes RC controller inputs, which remove any latency or delays caused by using the Raspberry Pi to control the car during training. With Robo HAT MM1, you can simplify your setup while improving the overall autonomous vehicle project.
We are already using the Robo HAT MM1 (and autonomous cars) as educational tools in school programs and workshops.
One of the core drivers of this project was the changing curriculum in Australian schools - all students must now learn to code as part of their technology course (this change came through in January 2019). Project Based Learning (PBL) - learning through doing or creating something seems to be the best way to teach students programming. We wanted to create a platform that could be used to learn the very basics of programming, all the way up to robotics and autonomous cars and beyond! The Robo HAT MM1 is one of the ways we hope to achieve better programming education in schools.
CircuitPython is one of the key parts to enable this, as students can start learning the basics of Python and then advance up to more complicated tasks.
Robo HAT MM1 works with RaspberryPi, Jetson Nano, and standalone. Board revision 6 seen here.
Board Diagrams
| External | |
|---|---|
| A. Inputs for radio controller | H. Auxiliary battery (4.2 V) |
| B. Raspberry Pi header (final version not stackable) | I. ESC power pass through |
| C. SPI connector | J. Main battery (7-15 V, 1000 mAh capacity) |
| D. GPS connector | K. USB connector |
| E. I²C external connector | L. Power-on button |
| F. Telemetry / USART connector | M. Outputs for servos |
| Internal | |
|---|---|
| N. NeoPixel header | R. LED |
| O. E-Stop header | S. Pads for switching SPI connector |
| P. LiPo battery charging | T. Pads for switching I²C bus |
| Q. Reset button | U. Serial header |
Tons of Software Options
With support for major existing platforms, you are guarenteed to get your project up and running as fast as possible.
We designed Robo HAT MM1 to work with a wide range of software libraries, to enable anyone to build the project they want. This flexibility also means that Robo HAT MM1 is well-suited to a wide variety of use-cases.
CircuitPython is an education friendly open source derivative of MicroPython. CircuitPython supports use on educational development boards designed and sold by Adafruit. Adafruit CircuitPython features unified Python core APIs and a growing list of Adafruit libraries and drivers of that work with it.
CircuitPython adds hardware support to all of these amazing features [of Python]. If you already have Python knowledge, you can easily apply that to using CircuitPython. Even if you have no previous experience, it’s really simple to get started.
CircuitPython is a special programming language developed by Adafruit that is based on Python but focused purely on writing code for hardware. It has many thousands of libraries for different sensors. It makes programming motors, servos, sensors and other bits easy. CircuitPython doesn’t require any software on your computer - it runs on the board (Robo HAT MM1) which appears as a USB drive.
Typically, CircuitPython is what we expect our backers to be using. We have used it for reading data from the MPU9250 IMU sensor, then using that data to control a robot arm. We have also used it to read RC signals from an RC Remote and send those signals back to the Servos attached to the Robo HAT. There are many other example uses that you can come up with. Adafruit has many great tutorials on CircuitPython and how to use it.
CircuitPython screenshot.
Seesaw is an open source microcontroller friend for other chips. It provides a variety of capabilities such as UART, ADC, DAC, extra GPIO, etc. to chips that don’t have them.
The other Adafruit library we are supporting is SeeSaw. SeeSaw runs on the Robo HAT and you can use a Raspberry Pi to make it do things using Python. All commands are sent from the Raspberry Pi to the Robo HAT over I2C. The typical use case for this would be that you have a robot or car that you only want to use the Robo HAT to control Servo Motors, Encoders or other attached sensors over UART or SPI.
SeeSaw can be partnered with a Raspberry Pi to form a powerful combination. The Raspberry Pi can do all the hard calculations for your robot (such as neural networks and image processing) and then send all the control commands to the Robo HAT MM1 through I²C running SeeSaw. SeeSaw has many special functions built into it, including: 16-bit servo control (much higher than normal 8-bit or common 12-bit), 12-bit analog read, USB-Serial to UART for communicating with the Raspberry Pi via USB, and more.
We are expanding SeeSaw SeeSaw has a few limitations. It only supports some features of the powerful processor on the Robo HAT MM1. We are looking at expanding what SeeSaw is able to do to support RC Input and controlling some logic of the board (like the power-on button). It is also well documented. Overall, it is a very useful library if you plan on using the Raspberry Pi and the Robo HAT together.
The classic Arduino IDE used by many thousands of makers around the world can also be used to program and deploy code to the Robo HAT MM1.
Most people are familiar with the Arduino IDE. It has many millions of users around the world. It brings with it all the existing libraries and code examples that work on popular Arduino boards. We are supporting this as it allows the existing THOUSANDS of software libraries developed for Arduino to run on the Robo HAT. This includes interfacing with GSM modules, reading GPS coordinates, and using any kits that you may already have.
Almost any hardware problem when using Arduino has already been solved by an online forum! This is the sort of support we wanted to maintain with the Robo HAT, and can by having Arduino’s programming environment available to backers.
We believe that these libraries can be added on in the future, expanding the number of projects that you can do.
We are currently working on these libraries and plan on bringing others as fast as possible.
- ArduPilot Control (testing)
- PX4 (Dronecode) Flight Control (in development)
- Scratch Environment (in development)
The Robo HAT MM1 holds its own amongst the drone controllers, CircuitPython boards and other Raspberry Pi HATs.
| MM1 HAT | PXFmini (unavailable) | NAVIO2 | PixHawk Cube | Feather M0 | CrickitHAT | Sense HAT | |
|---|---|---|---|---|---|---|---|
| Open Hardware | Open | Closed | Closed | Closed | Open | Open | Closed |
| Onboard Microprocessor | Yes | No | Yes | Yes | Yes | Yes | No |
| Flash Storage | 8 MB | 2 MB | 2 MB | 2 MB | |||
| Sensors | |||||||
| Accelerometer | Yes | Yes | Yes | Yes | No | No | Yes |
| Gyroscope | Yes | Yes | Yes | Yes | No | No | Yes |
| Magnetometer | Yes | Yes | Yes | Yes | No | No | Yes |
| Pressure | External | Yes | Yes | Yes | No | No | Yes |
| Temperature | Yes | No | No | No | No | No | Yes |
| Current | Yes | No | Yes | No | No | No | No |
| GPS | External | No | Yes | No | No | No | No |
| I/O | |||||||
| PWM Outputs | 8 | 8 | 14 | 8 | 7 | 4 | 0 |
| Input Channels | 4 | 1 | 1 | 2 | 7 | 8 | 0 |
| Additional GPIO | 11 | 0 | 0 | 6 | 7 | 8 | 0 |
| Total GPIO | 23 | 9 | 15 | 16 | 21 | 20 | 0 |
| Connectors | |||||||
| GPS | Yes | No | No | Yes | No | No | No |
| I²C | Yes | Yes | Yes | Yes | No | No | No |
| UART | Yes | Yes | Yes | Yes | No | No | No |
| SPI | Yes | No | No | No | No | No | No |
| CAN | No | No | No | Yes | No | No | No |
| USB | Yes | No | No | Yes | Yes | Yes | No |
| Power | |||||||
| Triple - Redundancy | Yes | Yes | Yes | Yes | No | No | No |
| Raspberry Pi | Yes | Yes | Yes | No | No | No | No |
| Software | |||||||
| Arduino IDE | Yes | No | No | No | Yes | Yes | No |
| Python | Yes | Yes | No | No | No | Yes | Yes |
| CircuitPython | Yes | No | No | No | Yes | No | No |
| SeeSaw | Yes | No | No | No | Yes | Yes | No |
| ArduPilot | Yes | Yes | Yes | Yes | No | No | No |
| Price | $39 | $80 | $170 | $240 | $20 | $35 | $40 |
| ECCN | ERA99 |
| HSCODE |
A : 请您放心,唯样商城所售卖的商品均为原装正品,我们是国内外知名品牌厂商的电子元件授权经销商,从源头保证品质。
A : 唯样自营精选品牌获得原厂授权代理资质,可以提供代理证书。部分商品数据来源于合作伙伴(如信和达、富昌电子、RS电子),我们对产品都进行了严格的资质审核,拥有原厂标签和相关票据以供查验。
A : 我们提供线下付款服务,方便公司的采购与财务对接,具体操作流程可在线咨询客服。
A : 下单前请仔细核对产品型号信息,如因自身原因造成的误订错订,唯样将不接受退换货要求。如果产品出现数量不对、型号不符、产品质量问题时,请务必保留原包装和标签,并在两周内联系我们申请退货。

103990425
严选库存:0
| 价格梯度 | 单价(含税) |
|---|---|
|
暂无价格 |
|
|
最小包:1
制造商那里获得的最小包装数。由于唯样提供增值服务,因此最低起购数量可能会比制造商的最小包装数量少,如果要购买整盘,建议购买这个数量的整数倍
|
交期: 请咨询客服 |